Follow Me On Social Media!


Spooky Monster Cakesicles

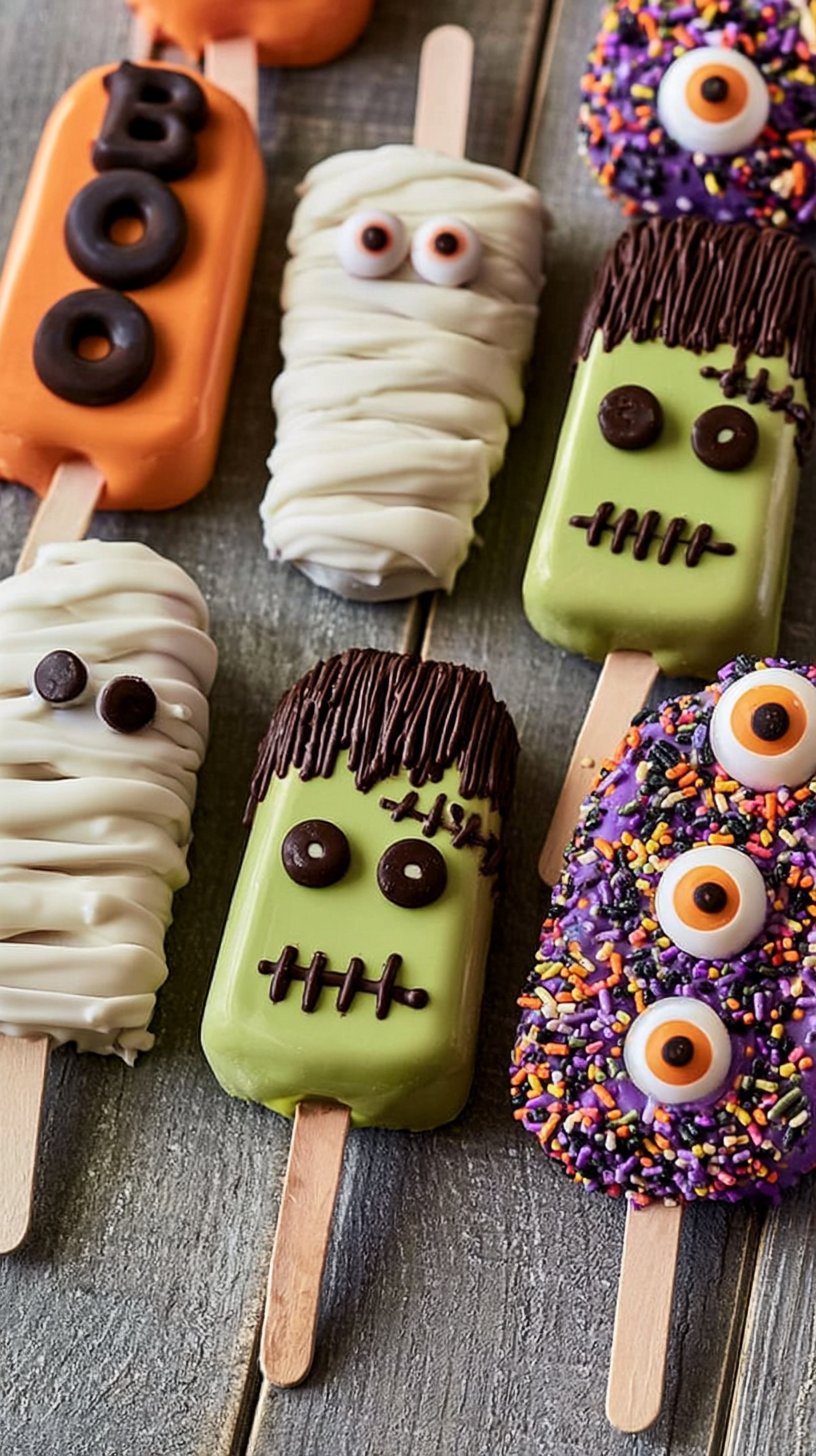
Spooky Monster Cakesicles are a delightful treat that adds a fun twist to any Halloween celebration. These adorable desserts not only look fantastic but also taste amazing, making them a hit among both kids and adults. The vibrant colors and playful shapes of these cakesicles make them perfect for parties, as they are easy to handle and eat. In this article, we will guide you through creating your own Spooky Monster Cakesicles, ensuring they are a centerpiece of your festivities. Each bite promises a rich flavor and a joyous experience that will leave everyone wanting more. For a similar spooky treat, consider trying gluten-free monster cookies.
What Makes This Recipe Stand Out
What truly distinguishes Spooky Monster Cakesicles from other desserts is their creativity and charm. These cakesicles not only serve as a sweet snack but also double as a festive decoration for your Halloween gatherings. A playful combination of colors, textures, and flavors transforms a traditional cake into these exciting pops, allowing you to showcase your creativity.
Culinary-wise, the versatility of this recipe is unmatched; you can customize flavors, chocolate coatings, and festive decorations to make them uniquely yours. The ability to mix and match ingredients allows for endless creativity, ensuring that each time you make these treats, they can be uniquely different. Whether you prefer a classic chocolate flavor or a fruity twist, these cakesicles deliver on both aesthetic appeal and taste, making them an unforgettable addition to your dessert table.
Ingredient Breakdown
To make Spooky Monster Cakesicles, you will need the following ingredients:
• Unsalted butter: Richness, moisture
• Chocolate chips: Chocolate flavor
• Granulated sugar: Sweetness
• Brown sugar: Chewiness, moisture
• Eggs: Structure, binding
• Vanilla extract: Flavor enhancement
• All-purpose flour: Structure
• Cocoa powder: Chocolate intensity
• Baking powder: Light lift
• Salt: Flavor balance
Each ingredient plays a vital role in creating the perfect cakesicles. For instance, unsalted butter brings richness and moisture, ensuring your cakes are never dry. Chocolate chips add an irresistible chocolate flavor, while granulated and brown sugars help achieve the perfect level of sweetness and chewiness. Eggs bind the ingredients together, providing structure, while vanilla extract enhances overall flavor. All-purpose flour offers essential structure, and cocoa powder intensifies the chocolate profile. Finally, the baking powder allows the cakes to rise slightly, and salt balances the sweetness for a well-rounded taste.
| Ingredient | Purpose |
|——————–|—————————|
| Unsalted butter | Richness, moisture |
| Chocolate chips | Chocolate flavor |
| Granulated sugar | Sweetness |
| Brown sugar | Chewiness, moisture |
| Eggs | Structure, binding |
| Vanilla extract | Flavor enhancement |
| All-purpose flour | Structure |
| Cocoa powder | Chocolate intensity |
| Baking powder | Light lift |
| Salt | Flavor balance |
Step-by-Step Preparation for Spooky Monster Cakesicles
Before diving into the preparation, let’s ensure we have everything in place for creating these delightful treats!
{image_template}
Step One
Begin by preparing the cake mix according to the package instructions. Whether you choose a classic vanilla or chocolate flavor, make sure to follow all the directions carefully, especially regarding mixing time and baking temperature. Once you have your batter ready, pour it into a pre-greased baking pan, and allow it to bake until a toothpick inserted in the center comes out clean. This usually takes about 25-30 minutes, depending on your oven. Once done, remove the cake from the oven and let it cool completely for the best results.
Step Two
After the cake has cooled down, it’s time to crumble it into a large mixing bowl. Using your hands or a fork, break the cake into small pieces until it resembles fine crumbs. The texture is crucial; ensure that the crumbs are not too big and not too fine. Now, add in the frosting of your choice, gradually mixing it until the frosting and cake crumbs are well-combined. You’re looking for a dough-like consistency that holds its shape when molded. This step is essential as it creates the moisture and flavor base for your cakesicles.
Step Three
Once your mixture is ready, it’s time to shape the cakesicles. If you have molds, pack the mixture firmly into them for a more uniform look. Alternatively, shape the mixture into balls (or pops) and then flatten them slightly for a traditional cakesicle. Insert lollipop sticks into each cakesicle, ensuring they go deep enough to remain stable when dipped in chocolate later. After preparing them, place the cakesicles in the freezer for about 30 minutes, or until they are firm. This step is critical as it helps them hold their shape during the dipping process.
Step Four
It’s finally time to coat your cakesicles! Melt the chocolate candy melts according to the package instructions, making sure not to overheat as it can become grainy. Once melted, carefully dip each frozen cakesicle into the chocolate, ensuring they are thoroughly coated. To remove excess chocolate, gently tap each cakesicle against the edge of the bowl before placing them back on a parchment-lined baking sheet. While the chocolate is still wet, decorate them with candy eyes and colorful sprinkles to bring your spooky creation to life. Allow the chocolate to set completely, giving you those beautifully coated cakesicles you have been waiting for!
Full Cooking Directions
- Prepare the cake mix according to package instructions and bake in a pan. Let it cool completely.
- Once cool, crumble the cake into a large bowl and mix in the frosting until well combined.
- Shape the mixture into cake pops or use molds for cakesicles. Insert lollipop sticks and freeze until firm.
- Melt the chocolate candy melts according to package instructions. Dip the frozen cakesicles into the melted chocolate to coat them completely.
- Allow excess chocolate to drip off and then decorate with candy eyes and colorful sprinkles.
- Let the chocolate set completely before serving.
Pro Tips & Extra Guidance
To ensure your Spooky Monster Cakesicles turn out perfectly every time, here are some professional tips to keep in mind. First, consider experimenting with different frosting flavors; cream cheese frosting can add a delightful twist, or perhaps a ganache for a richer taste. Additionally, using high-quality chocolate melts will significantly improve the final flavor of your cakesicles. If you want a Halloween-themed variety, consider adding food coloring to the chocolate to create different spooky shades.
For even more fun, try using flavored cake mixes such as red velvet or lemon for more variety. If you encounter difficulties with shapes, don’t hesitate to keep your mixture in the freezer just a bit longer to make it easier to mold. Following these tips will ensure the best results, making your cakesicles a stunning focal point at any gathering.
Best Practices for Storing & Reheating
Proper storage of your Spooky Monster Cakesicles is essential to maintaining their freshness and flavor. They can be kept these in an airtight container in the refrigerator for up to a week. Make sure to layer the cakesicles with parchment paper to prevent them from sticking to each other. If you want to store them for a longer time, consider freezing them. Place the cakesicles in a freezer-safe bag, separating layers with parchment paper. They can be frozen for up to three months; when you’re ready to enjoy them, simply remove them from the freezer and allow them to thaw in the refrigerator.
Reheating is straightforward; however, it is recommended to enjoy these treats cold or at room temperature for the best experience. If you must reheat them slightly, do so gently in the microwave for about 10-15 seconds. Be cautious not to melt the outer chocolate layer when reheating.
Common Questions Answered
How can I make these cakesicles gluten-free?
You can easily modify this recipe by using a gluten-free cake mix instead. There are many fantastic gluten-free options available that will work just as well.
Can I use different types of chocolate for coating?
Absolutely! Feel free to explore various types of chocolate such as white chocolate, milk chocolate, or dark chocolate for different flavor profiles.
How do I ensure my cakesicles maintain their shape?
Freezing them long enough before dipping is key. This helps solidify the mixture, allowing it to hold up better when being coated in chocolate.
What can I use instead of lollipop sticks?
If lollipop sticks aren’t available, you can use pretzel sticks or even forks for a fun alternative. They can add a unique touch to your cakesicles.
Can I make these in advance?
Yes, you can prep your cakesicles one to two days ahead of time. Keep them in an airtight container in the refrigerator until you are ready to serve.
Can I customize the decorations?
Certainly! Let your creativity flow and customize your cakesicles with various decorations such as edible glitter, themed sprinkles, or even colored icing.
Are these suitable for parties?
Definitely! Their portable format makes them an excellent choice for parties. Kids and adults alike will appreciate their whimsical appearance and delicious flavor.
Final Thoughts + Call to Action
Spooky Monster Cakesicles are more than just a dessert; they’re an experience that’s perfect for festive gatherings. Using this recipe, you can enjoy a delicious treat that captivates the spirit of Halloween while delivering mouthwatering flavors. We encourage you to host your own spooky celebration and share these delightful cakesicles with friends and family! Don’t forget to explore other fun recipes too, like the gluten-free monster cookies, for a complete spooky treat lineup!
Spooky Monster Cakesicles
Delightful cakesicles that combine rich flavors and festive decorations for a perfect Halloween treat.
Ingredients
Main Ingredients
- 1 cup Unsalted butter Provides richness and moisture
- 2 cups Chocolate chips For chocolate flavor
- 1 cup Granulated sugar For sweetness
- 1/2 cup Brown sugar Adds chewiness and moisture
- 3 large Eggs For structure and binding
- 2 teaspoons Vanilla extract Enhances flavor
- 2 cups All-purpose flour For structure
- 1/2 cup Cocoa powder Increases chocolate intensity
- 1 teaspoon Baking powder For light lift
- 1/2 teaspoon Salt Balances flavor
Instructions
Preparation
- Prepare the cake mix according to the package instructions and bake in a greased baking pan. Let it cool completely.
- Crumble the cooled cake into a large mixing bowl and mix in the frosting gradually until well combined to achieve a dough-like consistency.
- Shape the cake mixture into pops or use molds. Insert lollipop sticks and freeze until firm, about 30 minutes.
- Melt chocolate candy melts according to package instructions. Dip each frozen cakesicle into the melted chocolate to coat them completely.
- Let the excess chocolate drip off and decorate with candy eyes and sprinkles. Allow the chocolate to set before serving.
Notes
Experiment with different frosting flavors and chocolate types to customize your cakesicles. Store in an airtight container for up to a week or freeze for longer preservation.