Follow Me On Social Media!


Marbled Cheesecake

Marbled Cheesecake is a delightful dessert that artfully combines rich cream cheese and velvety chocolate layers into a sensational treat. This recipe strikes a perfect balance between creamy and indulgent, making it a popular choice for special occasions and casual get-togethers alike. Whether you’re a seasoned baker or just dipping your toe into the world of desserts, marbled cheesecake provides a forgiving canvas for delicious creativity. Curious about easier cheesecake recipes? You might find inspiration from cakes like the best easy cheesecake recipe!
What Makes This Recipe Stand Out
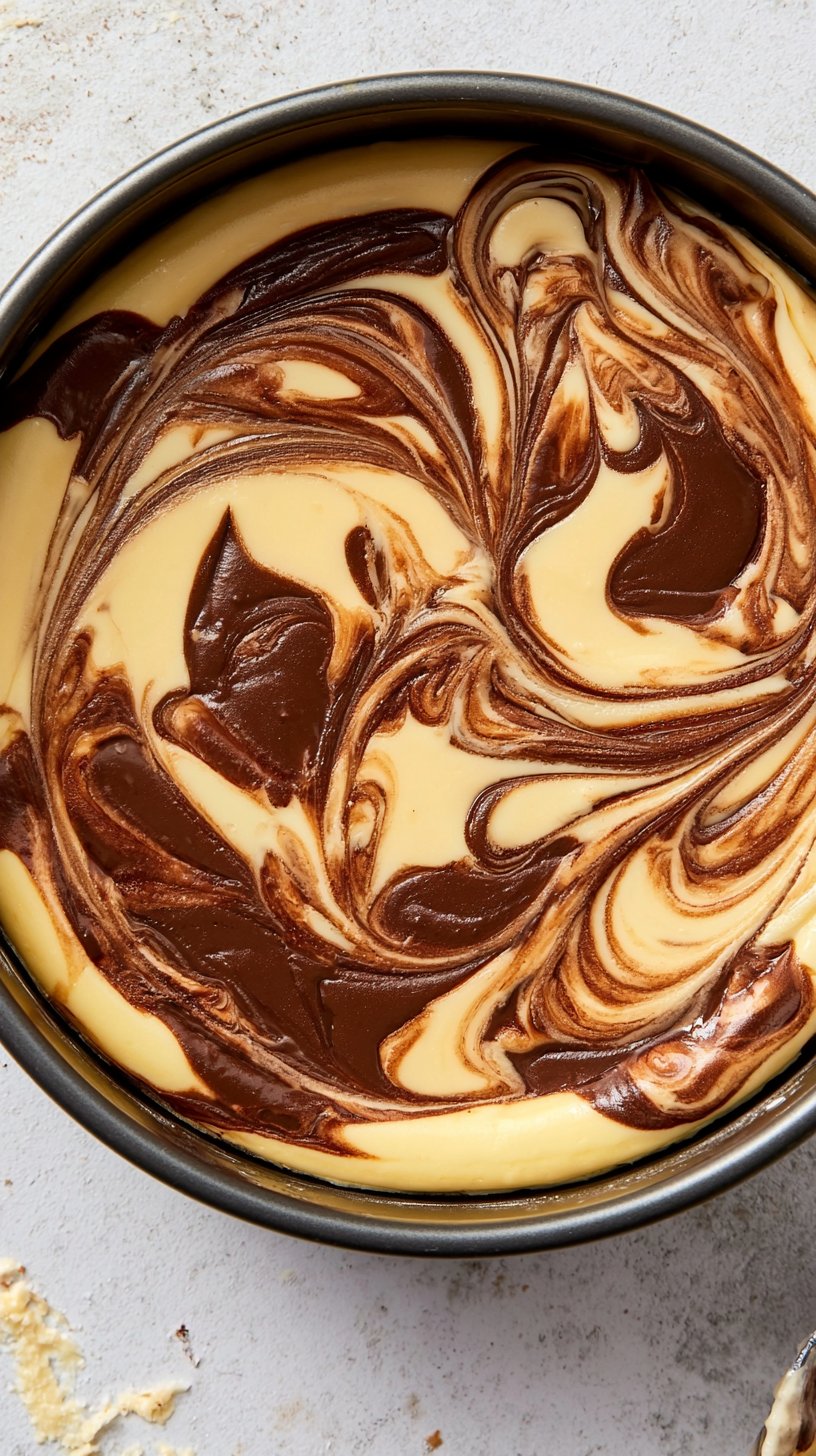
The beauty of Marbled Cheesecake lies not just in its taste but also in its stunning visual appeal. The marbling effect captures the essence of both vanilla and chocolate flavors, creating a dessert that’s as much a feast for the eyes as it is for the palate. Adding to its charm is the flexibility it offers; you can easily adjust recipes to suit your tastes, making it a fantastic choice for inventive bakers. You may also find Black Velvet Cheesecake Cookies 2 useful.
Moreover, the rich creamy texture of this cheesecake tends to enchant anyone who tries it. Its combination of cream cheese with eggs results in a firm yet creamy consistency that melts in your mouth. If you enjoy the depth of flavor presented by diverse ingredients, then a cake like burnt cream cheesecake might pique your interest as well.
Ingredient Breakdown
When preparing this Marbled Cheesecake, every ingredient plays a vital role in creating the desired flavor and texture. Let’s break them down:
• Unsalted butter: Richness, moisture
• Cream cheese: Creamy texture, tanginess
• Granulated sugar: Sweetness
• Eggs: Structure, binding
• Vanilla extract: Flavor enhancement
• Cocoa powder: Chocolate intensity
• All-purpose flour: Structure
• Baking powder: Light lift
• Salt: Flavor balance
This combination results in a cheesecake that is not only rich and satisfying but also thoroughly enjoyable. The melted butter adds essential moisture to the crust, while granulated sugar sweetens the creamy filling without overpowering it. Eggs bind all the components together, providing a sturdy base to support the luscious topping.
To elevate the experience even further, considering alternative toppings or crusts can enhance the overall flavor profile. Perhaps you’ll try something extravagant like black velvet cheesecake cookies for a unique twist.
Step-by-Step Preparation for Marbled Cheesecake
{image_template}
Step One
First, prepare your crust by combining graham cracker crumbs with melted unsalted butter and a bit of granulated sugar. This mixture not only forms the base of your cheesecake but also adds a lovely crunch that contrasts beautifully with the creamy filling. Press this mixture firmly into the bottom of a 9-inch springform pan, ensuring an even layer that will hold up against the rich filling.
Step Two
Next, it’s time to work on the filling. In a large mixing bowl, beat the cream cheese until it’s smooth and free of lumps. Gradually incorporate the sugar, mixing until well combined. This process develops a creamy base that allows the flavors to meld together perfectly. Remember to add vanilla extract at this stage; it enhances the overall flavor of your cheesecake, bringing a warm sweetness to the dessert.
Step Three
Now, add the eggs one at a time, mixing well after each addition. This step is crucial as it helps incorporate air into the batter, contributing to a light cheesecake texture. Divide the batter in half after thoroughly mixing; into one half, stir in cocoa powder, blending it until just combined. This chocolatey layer will juxtapose beautifully with the vanilla base, creating the signature marbled effect.
Step Four
With your batters ready, it’s time to assemble your masterpiece. Pour alternating layers of the vanilla and chocolate batters into the prepared crust. Here comes the fun part—using a knife or a skewer, create a swirling pattern to achieve that stunning marbled look. Bake the cheesecake in a preheated oven for about 55-60 minutes, or until the center is set. Once baked, let it cool before refrigerating it for at least four hours or overnight. This chilling process enhances the flavors and forms a perfectly sliceable dessert.
Full Cooking Directions
- Preheat your oven to 325°F (160°C).
- In a bowl, combine graham cracker crumbs, 1/2 cup sugar, and melted butter. Press this mixture into the bottom of a 9-inch springform pan.
- In a large mixing bowl, beat the cream cheese until smooth. Gradually add in 1 cup sugar and vanilla, mixing until well combined.
- Add eggs one at a time, mixing well after each addition.
- Divide the batter in half. Stir cocoa powder into one half and mix until blended.
- Pour alternating layers of vanilla and chocolate batter into the crust. Use a knife to swirl the batters together for a marbled effect.
- Bake in the preheated oven for about 55-60 minutes, or until the center is set.
- Remove from oven and let it cool. Refrigerate for at least 4 hours or overnight before serving.
- Drizzle with heavy cream before slicing if desired.
Pro Tips & Extra Guidance
To achieve the best results with your Marbled Cheesecake, consider the following tips:
-
Room Temperature Ingredients: Make sure all your ingredients, especially cream cheese and eggs, are at room temperature. This practice helps in blending them evenly, resulting in a smoother cheesecake.
-
Don’t Overbeat the Eggs: Overmixing the eggs can introduce too much air into the batter, leading to cracks during baking. Aim for a gentle mix instead.
-
Swirl Technique: Be clever with your swirling! Too many swirls may muddle the flavors, while too few won’t achieve the desired marbled effect. Find a balance for aesthetic appeal.
-
Flavor Variations: Feel free to experiment by adding different extracts, such as almond or coconut, or incorporating fruit purees for added flavor depth.
-
Water Bath Baking: For an extra smooth texture, consider using a water bath when baking. This technique creates steam in the oven, reducing the likelihood of cracks.
Best Practices for Storing & Reheating
Storing your Marbled Cheesecake properly will keep it fresh and delicious for days. After it has sufficiently cooled and set in the fridge overnight, cover it loosely with plastic wrap or aluminum foil. It’s key to avoid pressing it tightly, as doing so might mar the beautiful surface of your dessert.
For long-term storage, you can freeze your cheesecake. Wrap it tightly in plastic wrap, then place it in an airtight container. It’s advisable to enjoy frozen cheesecake within three months for the best flavor and texture.
When ready to serve, thaw the cheesecake overnight in the fridge. Reheat slices gently in the microwave for about 10-15 seconds if you prefer a warm dessert experience, or serve it straight from the fridge for a refreshing treat.
Common Questions Answered
What can I use instead of graham crackers for the crust?
You can opt for various alternatives, such as digestive biscuits, crushed Oreos, or even nut-based crusts for a gluten-free option.
How do I prevent cracks in my cheesecake?
To minimize cracks, avoid overmixing the batter, and consider baking your cheesecake in a water bath for even cooking.
Can I use low-fat cream cheese?
While low-fat cream cheese can be used, it may alter the texture and flavor. For best results, traditional full-fat cream cheese is recommended.
Is it necessary to refrigerate the cheesecake?
Yes, chilling the cheesecake is essential as it helps it set properly and enhances the flavors.
Can I include fruit in the cheesecake filling?
Absolutely! Swirl in fruit purees or fold in fresh fruit pieces for added flavor complexity.
How long can I store cheesecake in the fridge?
Typically, your cheesecake will stay fresh for about 5 to 7 days in the refrigerator, provided it is stored correctly.
Can I make mini cheesecakes?
Yes! You can adapt the recipe to create mini cheesecakes by using a muffin tin or mini springform pans.
Final Thoughts + Call to Action
Making a Marbled Cheesecake is a delightful venture that rewards you with a stunning dessert bursting with flavor. Whether you’re celebrating a special occasion or simply indulging in a sweet craving, this recipe is sure to impress. Don’t hesitate to explore other enticing baked goods, including memorable options like black velvet cheesecake cookies. Happy baking!
Marbled Cheesecake
A delightful dessert that artfully combines rich cream cheese with velvety chocolate layers for a perfect balance of creamy indulgence.
Ingredients
For the crust
- 1 cup Graham cracker crumbs
- 1/2 cup Granulated sugar
- 1/2 cup Unsalted butter, melted
For the filling
- 32 ounces Cream cheese, softened Room temperature for easy mixing
- 1 cup Granulated sugar
- 4 large Eggs Room temperature
- 2 teaspoons Vanilla extract
- 1/4 cup Cocoa powder For chocolate layer
- 1/4 cup All-purpose flour For structure
- 1 teaspoon Baking powder For lift
- 1/4 teaspoon Salt Balance flavor
Instructions
Preparation
- Preheat your oven to 325°F (160°C).
- In a bowl, combine graham cracker crumbs, 1/2 cup sugar, and melted butter. Press this mixture into the bottom of a 9-inch springform pan.
- In a large mixing bowl, beat the cream cheese until smooth. Gradually add in 1 cup sugar and vanilla, mixing until well combined.
- Add eggs one at a time, mixing well after each addition.
- Divide the batter in half. Stir cocoa powder into one half and mix until blended.
Assembly and Baking
- Pour alternating layers of vanilla and chocolate batter into the crust.
- Use a knife to swirl the batters together for a marbled effect.
- Bake in the preheated oven for about 55-60 minutes, or until the center is set.
Cooling and Serving
- Remove from oven and let it cool.
- Refrigerate for at least 4 hours or overnight before serving.
- Drizzle with heavy cream before slicing if desired.
Notes
Ensure all ingredients are at room temperature for best mixing results. Consider using a water bath for smoother texture during baking.