
Follow Me On Social Media!

Whimsical Sunshine Yellow Cake
Whimsical Sunshine Yellow Cake
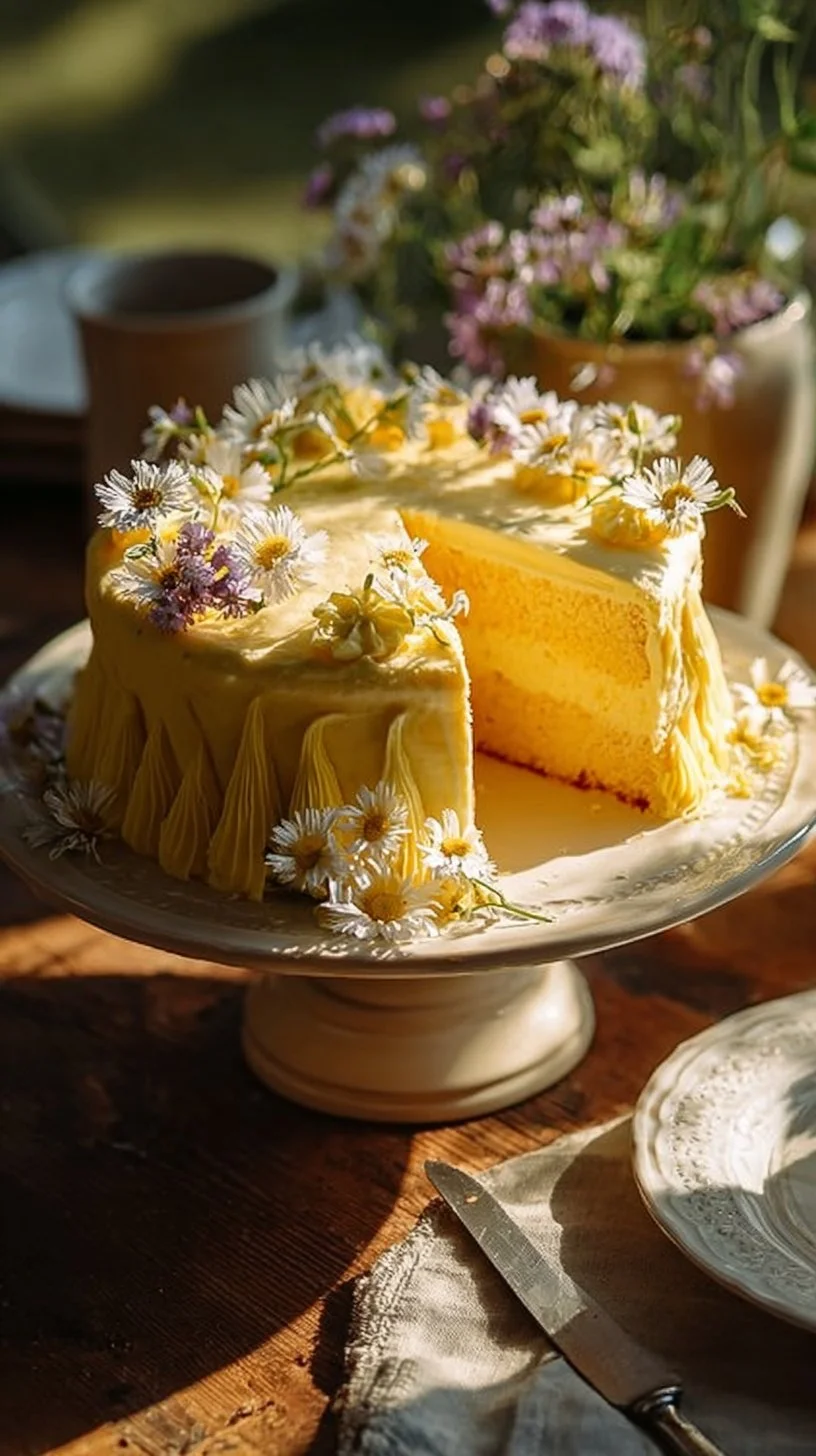
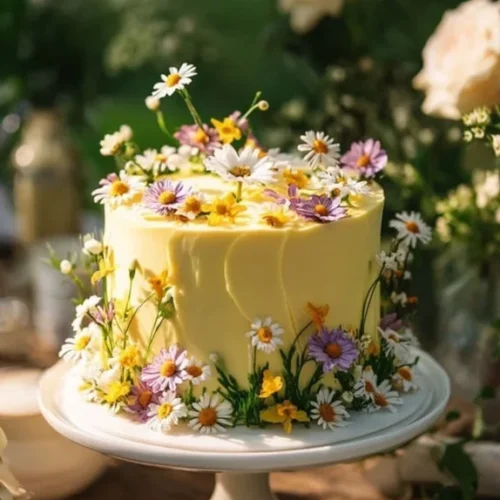
Whimsical Sunshine Yellow Cake is a delightful treat that radiates charm and joy from the moment you set eyes on it. This vibrant cake is not just a feast for the eyes but is laden with a rich, buttery flavor and an irresistibly moist texture. As you slice into this golden celebration of sweetness, you invite the warmth and happiness that comes from baked goods crafted with love. Whether you are celebrating a special occasion or simply indulging in a slice for the sweet moments of everyday life, this cake brings smiles and cheers to anyone lucky enough to try it.
What Makes This Recipe Stand Out
What truly sets this Whimsical Sunshine Yellow Cake apart is its enchanting balance between simplicity and elegance. At its core, this recipe combines familiar ingredients that transform into something spectacular. The cake’s bright yellow hue comes not only from the summer sun yellow food coloring but also from the golden quality of the egg yolks used, infusing both color and flavor into every bite.
Moreover, the texture of this cake is a testament to its thoughtful preparation. The creaming method—where butter blends with sugar—creates a fluffy lightness that gives the cake a delightful crumb. Every slice possesses a moist density that perfectly captures the spirit of a classic birthday cake yet feels versatile enough for any celebratory occasion.
Beyond its physical characteristics, emotional connections form around this cake. Memories of birthday parties, sunny afternoons, and gatherings with friends linger with each swallow, inspiring the soul. When you bring Whimsical Sunshine Yellow Cake to a gathering, you are not only sharing a dessert; you are sharing laughter, warmth, and the sweet nostalgia of fond moments. People gravitate toward its cheerful presence, making it a star attraction on any dessert table.
Finally, this cake showcases customization to make it uniquely yours. Top it with colorful edible flowers, sprinkle on a dusting of powdered sugar, or serve it with mounds of whipped cream and fresh berries to create eye-catching presentations that fit any occasion. With those traits combined, Whimsical Sunshine Yellow Cake stands out not just as a dessert, but as an experience cherished by all.
Ingredient Breakdown
To whip up the Whimsical Sunshine Yellow Cake, gather the following key ingredients:
- Granulated Sugar: This is the sweet backbone of your cake.
- Unsalted Butter: Critical for flavor and moisture.
- Eggs: Essential for structure and richness.
- Vanilla Extract: Introduces a warm, aromatic essence.
- All-Purpose Flour: Provides the bulk and structure.
- Baking Powder: Acts as a leavening agent, making the cake rise.
- Salt: Enhances flavor by balancing the sweetness.
- Whole Milk: Contributes to moisture and richness.
- Yellow Food Coloring: Adds a lively hue to the cake.
Now, let’s dive deeper into the roles of these ingredients. The granulated sugar serves a dual purpose in this cake; it not only sweetens, but its incorporation with the butter aerates the mixture, promoting a fluffy texture that lightens every bite. Unsalted butter ensures that you control the salt content while providing a rich, creamy foundation.
Eggs, particularly the yolks, add both a lovely color and stability to the batter. The natural fats in the yolks create a moist crumb that transcends ordinary cake. Vanilla extract amplifies the flavor profile, offering aromatic notes that weave throughout the cake as it bakes, enhancing the overall experience.
All-purpose flour forms the body of the cake; however, it’s essential to measure it correctly to avoid a dense texture. Baking powder becomes your trusty ally in achieving that light and airy quality, while a pinch of salt rounds out the sweetness, instilling robust flavor from the first bite to the last. Whole milk plays its role with creamy richness and helps to maintain moisture throughout baking, ensuring that your cake doesn’t dry out. Finally, a few drops of yellow food coloring will transform your cake into a visual delight, embodying the sunshine it is meant to represent.
| Ingredient | Purpose |
|———————|————————————————|
| Granulated Sugar | Sweetens and aerates |
| Unsalted Butter | Adds flavor and moisture |
| Eggs | Provides structure and richness |
| Vanilla Extract | Enhances overall flavor |
| All-Purpose Flour | Offers bulk and texture |
| Baking Powder | Leavens and helps the cake rise |
| Salt | Balances flavors |
| Whole Milk | Adds moisture and richness |
| Yellow Food Coloring | Provides a cheerful, bright appearance |
Step-by-Step Preparation for Whimsical Sunshine Yellow Cake
Step One
To begin, preheat your oven to 350°F (175°C) and prepare your cake pan. Greasing and flouring the pan is crucial to ensure that your perfectly baked yellow cake slides out effortlessly when it’s time to serve. For this, you can use either cooking spray or a thin layer of softened butter followed by a dusting of flour to coat the sides and bottom. This method establishes a nonstick barrier, preventing any sticky mishaps.
Step Two
In a large mixing bowl, the magic begins as you cream together the softened unsalted butter and granulated sugar until the mixture appears light and fluffy. This process infuses air into the batter, which is vital for creating that fluffy texture. Beat the butter and sugar until they meld into a pale, creamy mixture, then add the eggs one at a time, ensuring each one is fully incorporated before adding the next. This stage not only binds the ingredients but imbues richness into the cake. Finally, pour in the vanilla extract, stirring gently until well combined.
Step Three
While the wet ingredients come together beautifully, it’s time to focus on your dry ingredients. In another mixing bowl, combine all-purpose flour, baking powder, and salt. Whisk these ingredients together until they are thoroughly mixed. This is essential because it helps ensure even distribution of the leavening agent, resulting in a uniform rise. Next, you will alternate adding the dry mixture and the whole milk to the butter-sugar-egg blend, beginning and ending with the dry ingredients. This careful incorporation helps retain the fluffiness you achieved in the previous steps while creating a smooth batter.
Step Four
As you finish mixing your batter, you may choose to stir in yellow food coloring if you desire an even more vibrant cake—just a few drops will create a sunny hue. Carefully pour your batter into the prepared cake pan, smoothing the surface for an even rise while the cake bakes. Place this cheerful yellow cake into the preheated oven and bake for about 25 to 30 minutes. It’s crucial to test the cake for doneness by inserting a toothpick into the center; it should come out clean if the cake has properly baked. Once you pull it from the oven, allow it to cool in the pan for a few minutes before transferring it to a wire rack to cool completely.
Full Cooking Directions
Start by preheating your oven to 350°F (175°C). While this heats up, prepare your cake pan by greasing it with butter and dusting it lightly with flour. This preparation will ensure that when your cake is finished baking, it comes out of the pan beautifully and intact, which is vital for presentation. You’ll want to create a fluffy and airy batter, so in a large mixing bowl, cream the softened unsalted butter with granulated sugar until the mixture is light in color and fluffy in texture. The goal here is to incorporate air that will help the cake rise as it bakes.
Next, integrate the eggs into your creamed mixture one at a time, ensuring each egg is well blended before introducing the next. This method offers stability and richness to the batter. Adding the vanilla extract further enhances the flavor, making it a foundational element of your cake. Meanwhile, in a separate bowl, whisk together the all-purpose flour, baking powder, and salt. This ensures your dry ingredients are evenly combined, allowing the baking powder to help the cake rise uniformly.
Gradually merge your dry ingredients with the wet mixture, alternating with the whole milk. This technique not only keeps the batter light but also prevents clumping. As you mix, aim for a smooth and homogenous batter. If you desire, add a few drops of yellow food coloring to the batter, allowing it to become a vibrant representation of sunny happiness. Once your batter is ready, pour it into the prepared cake pan, leveling the top with a spatula before placing it in the oven. Bake for 25 to 30 minutes, and perform the toothpick test for doneness—if it comes out clean, you are good to go.
Allow your cake to cool for a short while in the pan before carefully transferring it to a wire rack. This prevents it from becoming soggy. Once completely cooled, feel free to decorate the cake with luscious frosting, a sprinkle of powdered sugar, or even some fresh edible flowers for a whimsical touch.
Pro Tips & Extra Guidance
To make your baking experience as smooth as butter, here are some pro tips to consider. First and foremost, room temperature ingredients are key. If your butter and eggs are cold, they will not combine properly, leading to a dense cake. Allow your eggs to sit out for about 30 minutes before beginning your recipe, and soften the butter to a workable consistency.
For those looking to mix it up, explore different flavor variations! You might experiment with varying extracts such as almond or lemon for a unique spin. Adding a zest of lemon can enhance the cake’s brightness, while almond extract may lend a cozy flavor profile that complements the vanilla.
If you’re concerned about achieving the perfect rise, consider using a kitchen scale for more precise measurements, especially with your flour. Many bakers find that weight measurement yields better results than volume measurements alone.
Lastly, do not fret if your cake slightly domes in the middle as it bakes. This is a common occurrence. Simply trim the top flat once the cake is cool, allowing for an even frosting layer.
Best Practices for Storing & Reheating
To ensure that your Whimsical Sunshine Yellow Cake remains fresh and delectable, proper storage is essential. If you are not serving it immediately, wrap the cooled cake tightly in plastic wrap or store it in an airtight container. This precaution prevents it from drying out, allowing the delightful moisture to linger within.
For short-term storage, you may keep the cake at room temperature for up to three days if covered correctly. However, for more prolonged enjoyment, consider refrigerating it, where it can last up to a week. To reheat, simply slice off a piece and microwave for 10 to 15 seconds, just enough to bring back that fresh-from-the-oven warmth without drying it out further.
If you want to extend its shelf life even more, freezing is an excellent option. Ensure the cake is fully cooled, then wrap it tightly with plastic wrap and aluminum foil to protect it from freezer burn. You can store it in the freezer for up to three months. When you’re ready to enjoy it again, thawing overnight in the refrigerator works wonders. For added freshness, you may want to reheat it in an oven preheated to 350°F for about ten minutes.
Common Questions Answered
What should I do if my cake sinks in the middle?
If your cake sinks in the middle, it may be due to various reasons such as underbaking or adding too much leavening agent. Always follow the recipe closely and double-check your measurements. Conducting a toothpick test helps confirm that the cake is thoroughly cooked before removing it from the oven.
Can I substitute ingredients in the recipe?
Absolutely! You can substitute buttermilk for whole milk if desired—this will add a lovely tanginess. For a dairy-free option, use almond milk or coconut milk. Regarding butter, a vegan alternative can work well; just ensure the texture is similar.
How can I decorate the cake?
You may decoratively frost the cake with buttercream, cream cheese frosting, or a simple glaze. Also, consider topping it with fresh fruits, edible flowers, or even colorful sprinkles for an eye-catching finish.
Is this cake suitable for layered cakes?
Yes! The Whimsical Sunshine Yellow Cake is perfect for layering. Just be sure to adjust your cooking time if you’re baking multiple layers at once. Use a serrated knife to slice layers evenly, creating a stunning, multi-layered beauty that looks as good as it tastes.
How can I make the cake more moist?
To enhance moisture, try using cake flour instead of all-purpose flour. You can also incorporate an additional egg yolk or use sour cream in place of some milk for added richness and moisture.
Is it possible to make mini versions of this cake?
Certainly! You can bake this cake in a muffin tin to create delightful mini cakes or cupcakes. Just make sure to adjust the baking time, typically around 15-20 minutes, depending on your oven.
Can I use this recipe for other flavors?
While the recipe shines in its yellow cake form, feel free to infuse it with different flavors. You could mix cocoa powder in to make it chocolate, or create a layer of citrus zest for a burst of flavor. Adapting this recipe can be a fun way to explore!
Final Thoughts + Call to Action
Whimsical Sunshine Yellow Cake is more than just a dessert; it symbolizes joy, celebration, and the vibrant spirit of togetherness. Perfect for birthdays, gatherings, or simply enjoying life’s sweet moments, this cake truly brightens up any occasion. Now is the perfect time to dive into the whimsical world of baking. Grab your ingredients and begin your journey to some homemade happiness today!
Whimsical Sunshine Yellow Cake
A delightful and vibrant cake that radiates charm, perfect for celebrations or sweet moments in everyday life.
Ingredients
Main Ingredients
- 1 cup Granulated Sugar Sweetens and aerates the cake.
- 1/2 cup Unsalted Butter Adds flavor and moisture.
- 3 large Eggs Provides structure and richness.
- 1 teaspoon Vanilla Extract Enhances overall flavor.
- 2 cups All-Purpose Flour Offers bulk and texture.
- 2 teaspoons Baking Powder Leavens and helps the cake rise.
- 1/2 teaspoon Salt Balances flavors.
- 1 cup Whole Milk Adds moisture and richness.
- a few drops Yellow Food Coloring Provides a cheerful, bright appearance.
Instructions
Preparation
- Preheat your oven to 350°F (175°C) and prepare your cake pan by greasing and flouring it.
- In a large mixing bowl, cream together the softened unsalted butter and granulated sugar until light and fluffy.
- Add the eggs one at a time, fully incorporating each before adding the next, then stir in the vanilla extract.
- In another bowl, whisk together the all-purpose flour, baking powder, and salt.
- Alternate adding the dry mixture and the whole milk to the creamed mixture, beginning and ending with the dry ingredients.
- Optionally, mix in the yellow food coloring.
- Pour the batter into the prepared cake pan and smooth the surface.
Baking
- Bake in the preheated oven for about 25 to 30 minutes, or until a toothpick inserted into the center comes out clean.
- Allow the cake to cool in the pan for a few minutes before transferring it to a wire rack to cool completely.
Notes
Room temperature ingredients yield the best results. Feel free to customize with decorations like frosting, powdered sugar, or fresh fruits.